Monday, 29 August 2016

Week 4 Research

Good morning

For this research sort of this week I am going to base it around going to Kelly Tarltons in the weekend with Stephanie, Dorothy and Tahanga. So for the two found images this week I want to base it around Sealife photography.


Photographer: David Doubilet
Title: Australian Sealion.
Date: 2007
Medium: Underwater photography.

I like this photograph because it gives a personal relationship between the viewer and the subject, and it is also super cute. I like the colour given in this photo with the blurry serene blues and the stark black colour.

My response to this photo is:


ISO: 6400
Aperture: 5.0
Shutter: 1/50
Auto white balance.

I like this photo because the pufferfish is Up close and personal and it looks like he is staring me in the face, almost like having a conversation with him. I also like how his eyes look as well, its a very curious fish. What I don't like about this photo is that I had to use a very high ISO to make the picture visible and in doing so has made the picture look grainy/very noisey. But I like the fact that I used a low aperture which makes the background very blurry which helps make up for a little of it. 


This photos have the same camera settings as the previous photo but I added this one because with the fish changing his stance or position in the frame it now looks like he is looking down on us in a very snobby way but I dislike the same things in this photo as well. 

The next found photo is:


This is a found image of Pinterest and I couldn't find the Author, Title or Date. But guessing just looking at this photo it could be at an aquarium because the light at the top of the screen looks more reflective as if taken with a flash, it is also at the right angle for a flash. but all the same, it is still and beautiful photo. I like it because it is a form of still life and also I like the pattern and the repetition of this anemone. 

My response:


ISO: 3200
Aperture: 4.5
Shutter Speed: 1/250
Auto White Balance. 
What I like most about this photo is the fact that the picture itself has been warped and what we see is not what entirely correct, and with the trippy colouring of this makes it look almost 3d. I also like that the shot was taken from above because it gives us a look inside of the anemone from side of it looks like it is all colourful arms when it isn't. I don't like the fact that the picture is slightly out of focus the picture itself ould have been twice as better if it was more crisp.  


ISO:6400
Aperture: 4.5
Shutter Speed: 1/250.
Auto white Balance. 

I really don't like the grainy/ noisy feel to this photo and the out of focusness. and the colouring to the photo isn't that great either. But what I do like is the Anonyme because it is a total kick ass sea creature with its sharp looking long arms. also the fact that it is black which add's to the factor. If you look closely it has what looks like a purple blob with an orange eye, (not sure if it is an eye but it does look like it.) This kind of makes it look like a monster.


I found this image as well through google. what I love about this photo is that it feels like it is two photos in one and it gives it a more deeper feeling. it sort of pulls on the don't judge a book by its cover. but the colouring is so beautiful and cold in this photo which makes it feel ethereal or mystical. 

My response to this is: 


This my original attempt but The penguins was being very uncooperative with me as I was taking pictures This image was hard because the glass was dirty so I couldn't get a clear picture. but Still I like the colouring but the image looks very flat and still grainy. 


I just wanted to show off this spectacular penguin. ( I love penguins) 


For this Image I finally managed to get a Penguin to cruise through the screen but he looks like a bloated plastic toy. 

The camera settings for all these are the same so here they are.
ISO: 3200
Aperture: 9.0
Shutter Speed: 1/50. 


and these are some honourable mentions from kelly tarltons. 


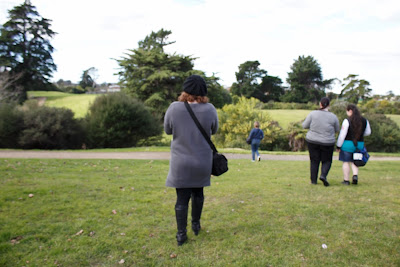
After going to Kelly Tarltons none of us was ready to go home, so we decided to go sit down and have a break and decide where to go to next in mission bay. After the break, we decided to go up to the Micheal Joseph savage memorial hill. It was a good place to take photos and with this being a will lit outside area I was able to start taking some decent photos for the first time that day. 


ISO: 200
Aperture: 5.6 
Shutter Speed: 1/250

I like the simplicity and casualness of this photo it came out well, I also noticed after taking this photo that there is a guy in the background who was staring at Stephanie and Tahanga's daughter Tuini. which kind of was creepy.


ISO: 200
Aperture: 5.6
Shutter Speed: 1/250
Auto White Balance.
I just like this photo because it is simple vand if you look closely you can see a guy there and his expression on his face was funny, although it feels kind of creepy as well the fact that he was staring at them. 
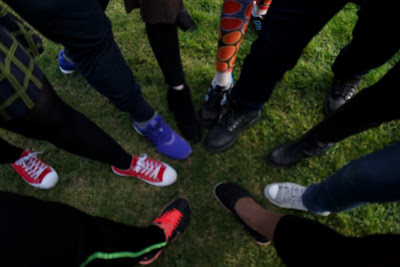


ISO: 200
Aperture: 3.5
Shutter Speed: 1/400

I like how innocent tuini looks in this photo and how sweet she looks and I like how I managed to get my lense to go down as low as it did, I haven't managed that before and in the end it came out with a very nice effect in total. 
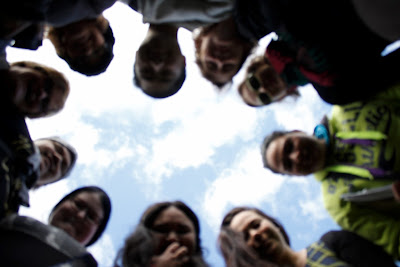


ISO: 100
Aperture: 3.5
Shutter Speed: 1/320

I like this because I really like reflections and photos of reflections I just wish That I could have had something nice in the reflection or more in there. 


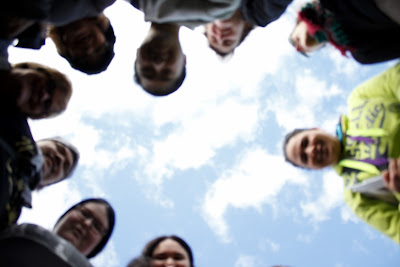
I just liked taking this one because it was in such an odd angle. 

After this we stoped and had a snack which tahanga basically brought which was very much apprieciated. We were all feeling low on energy. But we were not ready to give up on our day so we all jumped into Tahanga's car and shot down to the mission bay beach, which was a little more further away than we thought but that was ok thanks to Tahanga being able to drive us. 

I didn't take any photos on my dslr on the beach because the battery had died but I did take some on my phone, I like the fact that my phone can take nice photos but it just feels abit to much like the lazy way to do it now. 


Thursday, 18 August 2016

Monday 15th August 2016 week 4

For this morning when we started we ran through a checklist in class for what we have been doing in class the last 4 weeks to make sure that we are still on track and are doing what we are suppose to be doing.

What I need to do is make bullet points for light room for last week and this week as well.

I was thinking while Rebecca was talking that I might make my final project in to a poster maybe? possible idea. I asked wither we could do more than the 4 photos allocated in the course outline for final project and we are allowed to, The 4 photos was just a guideline. That is good news, keeps some options open.

Next in class we went over what is expected from our seminars/presentations at the end of this term. Both Rebecca and Marie showed us a presentation that they have done in the past. Rebeccas one gave me an idea of pre recording my voice for the presentation because I am terrible in speaking in front of a group of people, which is ironic considering that I am contemplating becoming a teacher.


These are good things to contemplate while we are preparing for the presentation.


In break I had a try at making a blurry background again because I didn't do so well last week when I tried it,


After some help from Rebecca I managed to pull this one of, She explained that the way my lens is made it wont get a low enough aperture to get a full blur and that I need the Object that needs to be in focus really close to the lens. 

Iso: 400
Aperture: 4.5
Shutter: 1/60


Sam just got her camera over the weekend so we were just playing around for these shots but i see now that I needed to bumb the ISO up because it is a little dark. all though i actually like the way it looks. 

In class we were learning about viewpoint and, fore, mid and back ground Photography shots.


These are screenshots off of Rebeccas blogs that was explaining what these shots look like. 


This was my favourite from Maries presentation. I love the creepy feel. It is also a very beautiful shot. 

After lunch we went out as a class into the creek to take our own view point photos, I started of sharing my camera with Tahanga and Lily but Tahanga broke off and joined up with Sam because it is hard to share a camera with to many people.  Between me and Lily we took nearly 90 photos, some are pretty bad but there was some really nice ones as well. 


These are the photos that I took that I liked it is a pity that the camera wasnt in focus in the circle photos but they all have their charm. I noticed in the foot photos that i forgot to stick in my foot. but i believe that these two different photos are good examples of different view points.  with the faces we had put my camera on a timer so we could put it on the ground. and as the photos progress, you can see that our faces were pulling a way because the camera didnt stop taking photos. That was super awkward. 

We went straight into the computer labs after this so that we could start the editing side of light room. 


These are just screen shots of some of the controls i was goofing around with. 

I have to admit that I do like some of the editing controls of lightroom but I could see a lot of room for improvements. 

Ill try to bulletpoint the pro's and cons of lightroom in my next blog thanks for reading. 


research week 3

Sorry this post has been late. We never managed to go to the zoo because when we got into Manurewa in the morning we found out there was no trains running for the weekend, which was quite annoying as they had no notice on the website which we were on, on Friday, looking for our travel timetable. So we have decided to leave the zoo until the holidays and see if more people from class are able to come as well. so for research I well carry on looking for more research ideas that I can practice before the presentation at the end of course. Next week I am hoping that I well get a chance to hire out a macro lens to see if I can work on my "heart" project, heart as in I feel very passionate about it but I don't know weither it will work out yet, hence practice needed.


I found this on facebook a couple days ago and I thought it was sort of similar to what I was wanting to do with eyes but instead of eye contacts I would be using a double exposure technique through photoshop. Plus This was also the way I was thinking of presenting the eyes at the end of semester, if i can afford to, I would like to put all the eyes that I might do together.

I also found this one on facebook, I dont know what the title or the artist who did either of these pictures are. I saw this and I thought that it was beautiful, and instead of drawing it I could use actual models, or some lovely people from class and practice these two. over the next week ill try and put some practice in.

Just doing some a small practice with the eyes i all ready had a photo just to see if i could remember how to use photoshop and I had forgotten how to use a lot of tools so I have spent the last two hours trying to remember it with help from google I have managed to put to at least layer the two different images,

To me it looks like the flower is blooming in the eye, Possible problems with doing this eye project is that I want to put the second image in the iris/ black part of the eye, and with a macro lens i need a lot of light because the macro lens doesn't let a lot of light through. 


I found this a little helpfull but i couldn't et it quite right and after a while I managed to do it on my own.


after looking through some of these i found nothing that useful to help. 

Wednesday, 10 August 2016

Monday 8th August, Week 3

good evening.

So far today we started with a couple breaking the ice games again. the first one was where we stood around in a circle and we had pretend guns. And when Rebecca calls out a name that person has to duck and the people on either side shoot each other, the person who shoots first and the game goes on until the last 2 people are standing and then those people stand back to back and walk until the hear the word yellow and then turn around and shoot, first person to shoot wins. then we played a couple others where we stood in a line in order of birth from January to december I was around the middle because i am in may. And the last one was the same theory but from our mothers maiden name. My mothers maiden name was Andrews. We sat down and went through the people who didn't do their toi's last week, but only two people stood up and did theirs, rudolf and Karen.

I brought biscuits to share with everyone, but really no one wanted any but that is fine someone at home well probably will.

Next we went though what we are doing for the day such as.

  • Skills
  • Application 
  • Individual kaupapa
  • Exposing correctly
  • DOF (depth of feild) Aperture 
  • DOF shutter
  • Lightroom
  • Catch up time
We took a look at skills and application with Rebecca to start with, She showed us one of her blogs about that,


The we had to talk in pair about what skills we have and what we can teach others, This was difficult because for this task i was the odd one out. But I have some basic camera skills using the canon camera and I am willing to teach others. And I am pretty good at baking which is always fun to do with other people. 


next we  talked about Haiku poems and we needed to make our own but man was that hard to do, but other people came up with some amazing ones, we have some very clever people in class. 

they are suppose to go like:
5 - 
7 - Sylables
5- 

So I made mine: 
Take some time to learn
Learn how to take some you time 
To be a better you.

Next Marie Talked to us about how to work smarter not harder. 

My final group which was, Sam, Crystal, Stephanie and myself came up with: 

- Brainstorm and bullet point so you don't go over the top doing unnecessary work.
- You can use school computers.
- Instead of printing use bloggers or facebook
- knowing your distractions so you know how to limit them.
- Build on old skills take time to learn new ones 
- learn how to collaborate.

After this we were given a photography task:

1 - Correct exposure by prioritising Aperture.
2 - Correct exposure by prioritising Shutter. 

 Prioritising Aperture.
ISO: 200
Aperture: 5.6
Shutter: 400

Prioritising Shutter.
ISO:100
Aperture: 11.0
Shutter: 1/60


After lunch we briefly came back to class to talk about depth of field and making a blurry background with the subject still in focus. 

Our task next was to go out and take 4 more photos:

1 deep dof (depth of field)
1 shallow dof
1 fast shutter speed freeze movement
1 slow shutter movement blur - tripod.

This wasn't the image I ended up taking but this is the best example of a freeze movement picture I had. I see that is also a little over exposed as well. It is a little blurry and needs a high shutter speed.
ISO: 100
Aperture: 10.0
Shutter: 1/60

This was extremely blurry because it was hand help, at the time I had no Tripod. but is a good example as to why I would need a tripod. 
ISO: 200
Aperture: 29.0
Shutter: 1/4

ISO:100
Aperture: 3.5
Shutter: 1/500


ISO: 400
Aperture: 14.0
Shutter: 1/100.

After taking these photos we split of and went into the computer suites to start our tutorial on lightroom. I can see the perks of the file management of lightroom which would be handy for a lot of people but honestly I really don't like it, I feel like bridge is a better version of it and then photoshop for the editing even bridge has a much better system for the smaller photo editing. But we still have another week for tutorials of lightroom and I well just have to get use to it. This saturday we are finally going to go to the zoo together, some of us from class. So we can start getting use to the cameras plus it is a good group bonding trip as well. So I am going to base this weeks research blog around that trip, for the planning and the photos as well, And talk about the general day. 

have a good week.


Friday, 5 August 2016

Research week 2


Well I am sitting in the computer labs after class and decided to start my research, one thing that has been bugging me to do is start learning how to apply special effects in photoshop. I found this video on youtube. 


This video is, How to Add Special Effects in Photoshop, It is by phlearn. For a starters I never knew about phlearn but after checking them out on phlearn.com they are a pretty interesting bunch and will definintly come in handy. The one annoying thing about this video is that the lighting effect thats on the lady to start with is all ready there, apparently it is done by long exposure on a camera and a sparkler stick. Maybe worth trying but will come back to that later. Some of the more useful tips in this video is the keyboard short cuts that you can use in photoshop. Some of the new things I learnt is about how to use the blending mode on photoshop, so I know how to change from normal to screen and a few others, and how to use the brush tool to bring out more layers that you set to invisible. I noticed that the person doing the photoshop was using some kind of a waccom tablet and I have no experience on using that, so another thing that i need to look into. Some of the things that I loved in this video tutorial is that he used some of the trashy photos that wouldn't be used in normal instances and he used them as backgrounds and they made the photo so much more amazing. I need to do more experimenting for this.


These are some photos on pinterest that I found fascinating, ones i might possible like to do for a class project.

I love this one because of the both the colour and the broken glass, which feels like a message. 


This one I love purely because it is an amazing reflection, I have in past tried some reflection photos, from glass balls, phone services and in windows and some puddles but not really any big success yet but I am not giving up yet.


Definitely in love with double exposure but i haven't any experience or practice yet.


These last two are just more ideas, but this last one I know is way above my level of skills for photoshop but it is still an amazing photo.